Oak kitchens were VERY in style… 20 years ago, but now, they are just dated. There have been beautiful houses on the market that just won’t sell because new buyers don’t want to deal with an oak kitchen. So before you pass on that steal of a house or think you need to paint your own, let me tell you some of the benefits to keeping quality oak cabinets the way they are.
Leaving them alone is less work. Win win.
Children can ram their toys into them, and you usually won’t even notice the giant dent. Oak is a fabulous camouflager.
Beautiful quality wood is timeless.
It pairs wonderfully with the right colors.
So here is how I took my oak kitchen (this house was built in 1997) and brought it into 2020.
When I first laid eyes on the photos of this house, I knew that the kitchen cabinets were quality cabinets. Having them go to the ceiling was just an added bonus! But don’t worry, if yours do not go to the ceiling, we can still bring them into 2020!!
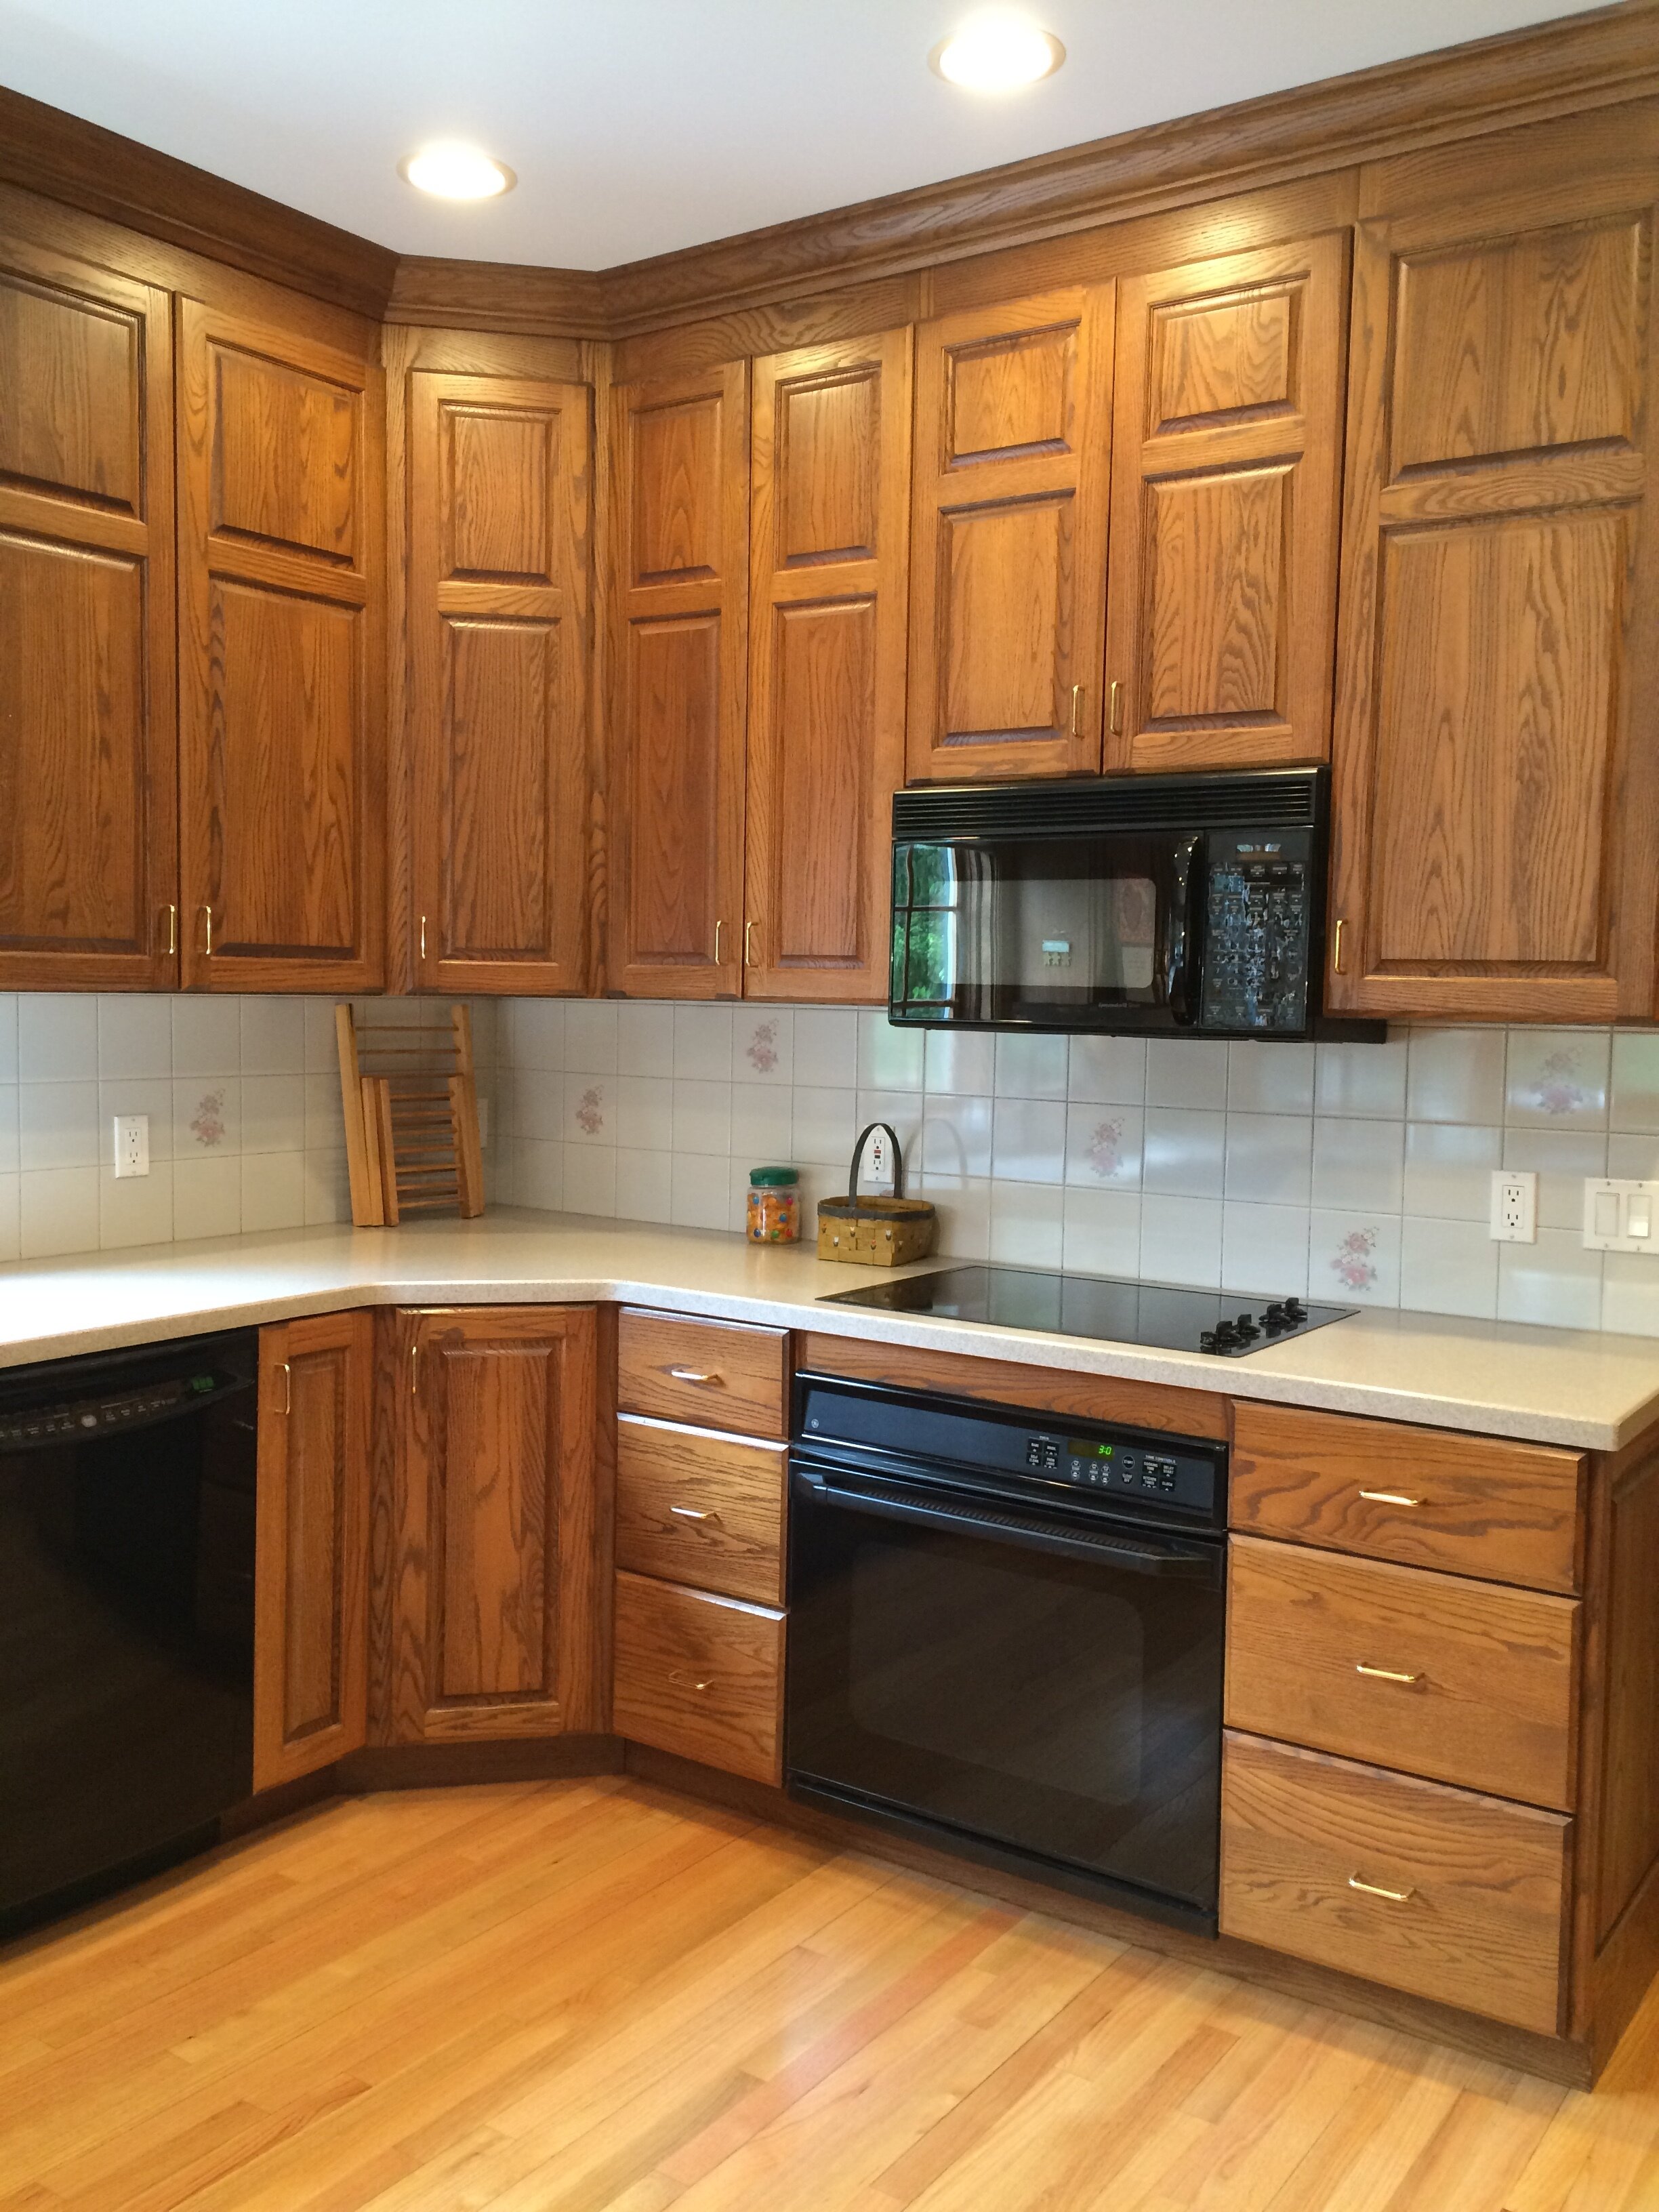
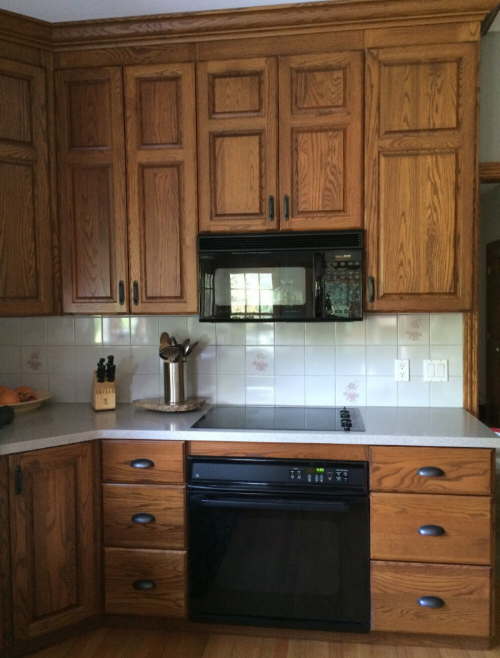
This is a photo I took of the kitchen the first time we walked through it. I knew this would be horrendous to most people, but I saw the potential it had.
When you move into a new house, the most important things come first (wah wah), like installing a new water softener, water purifiers, etc. We had to update the necessary things first (to my dismay), but this gave me time to think about what I really want to do with the kitchen.
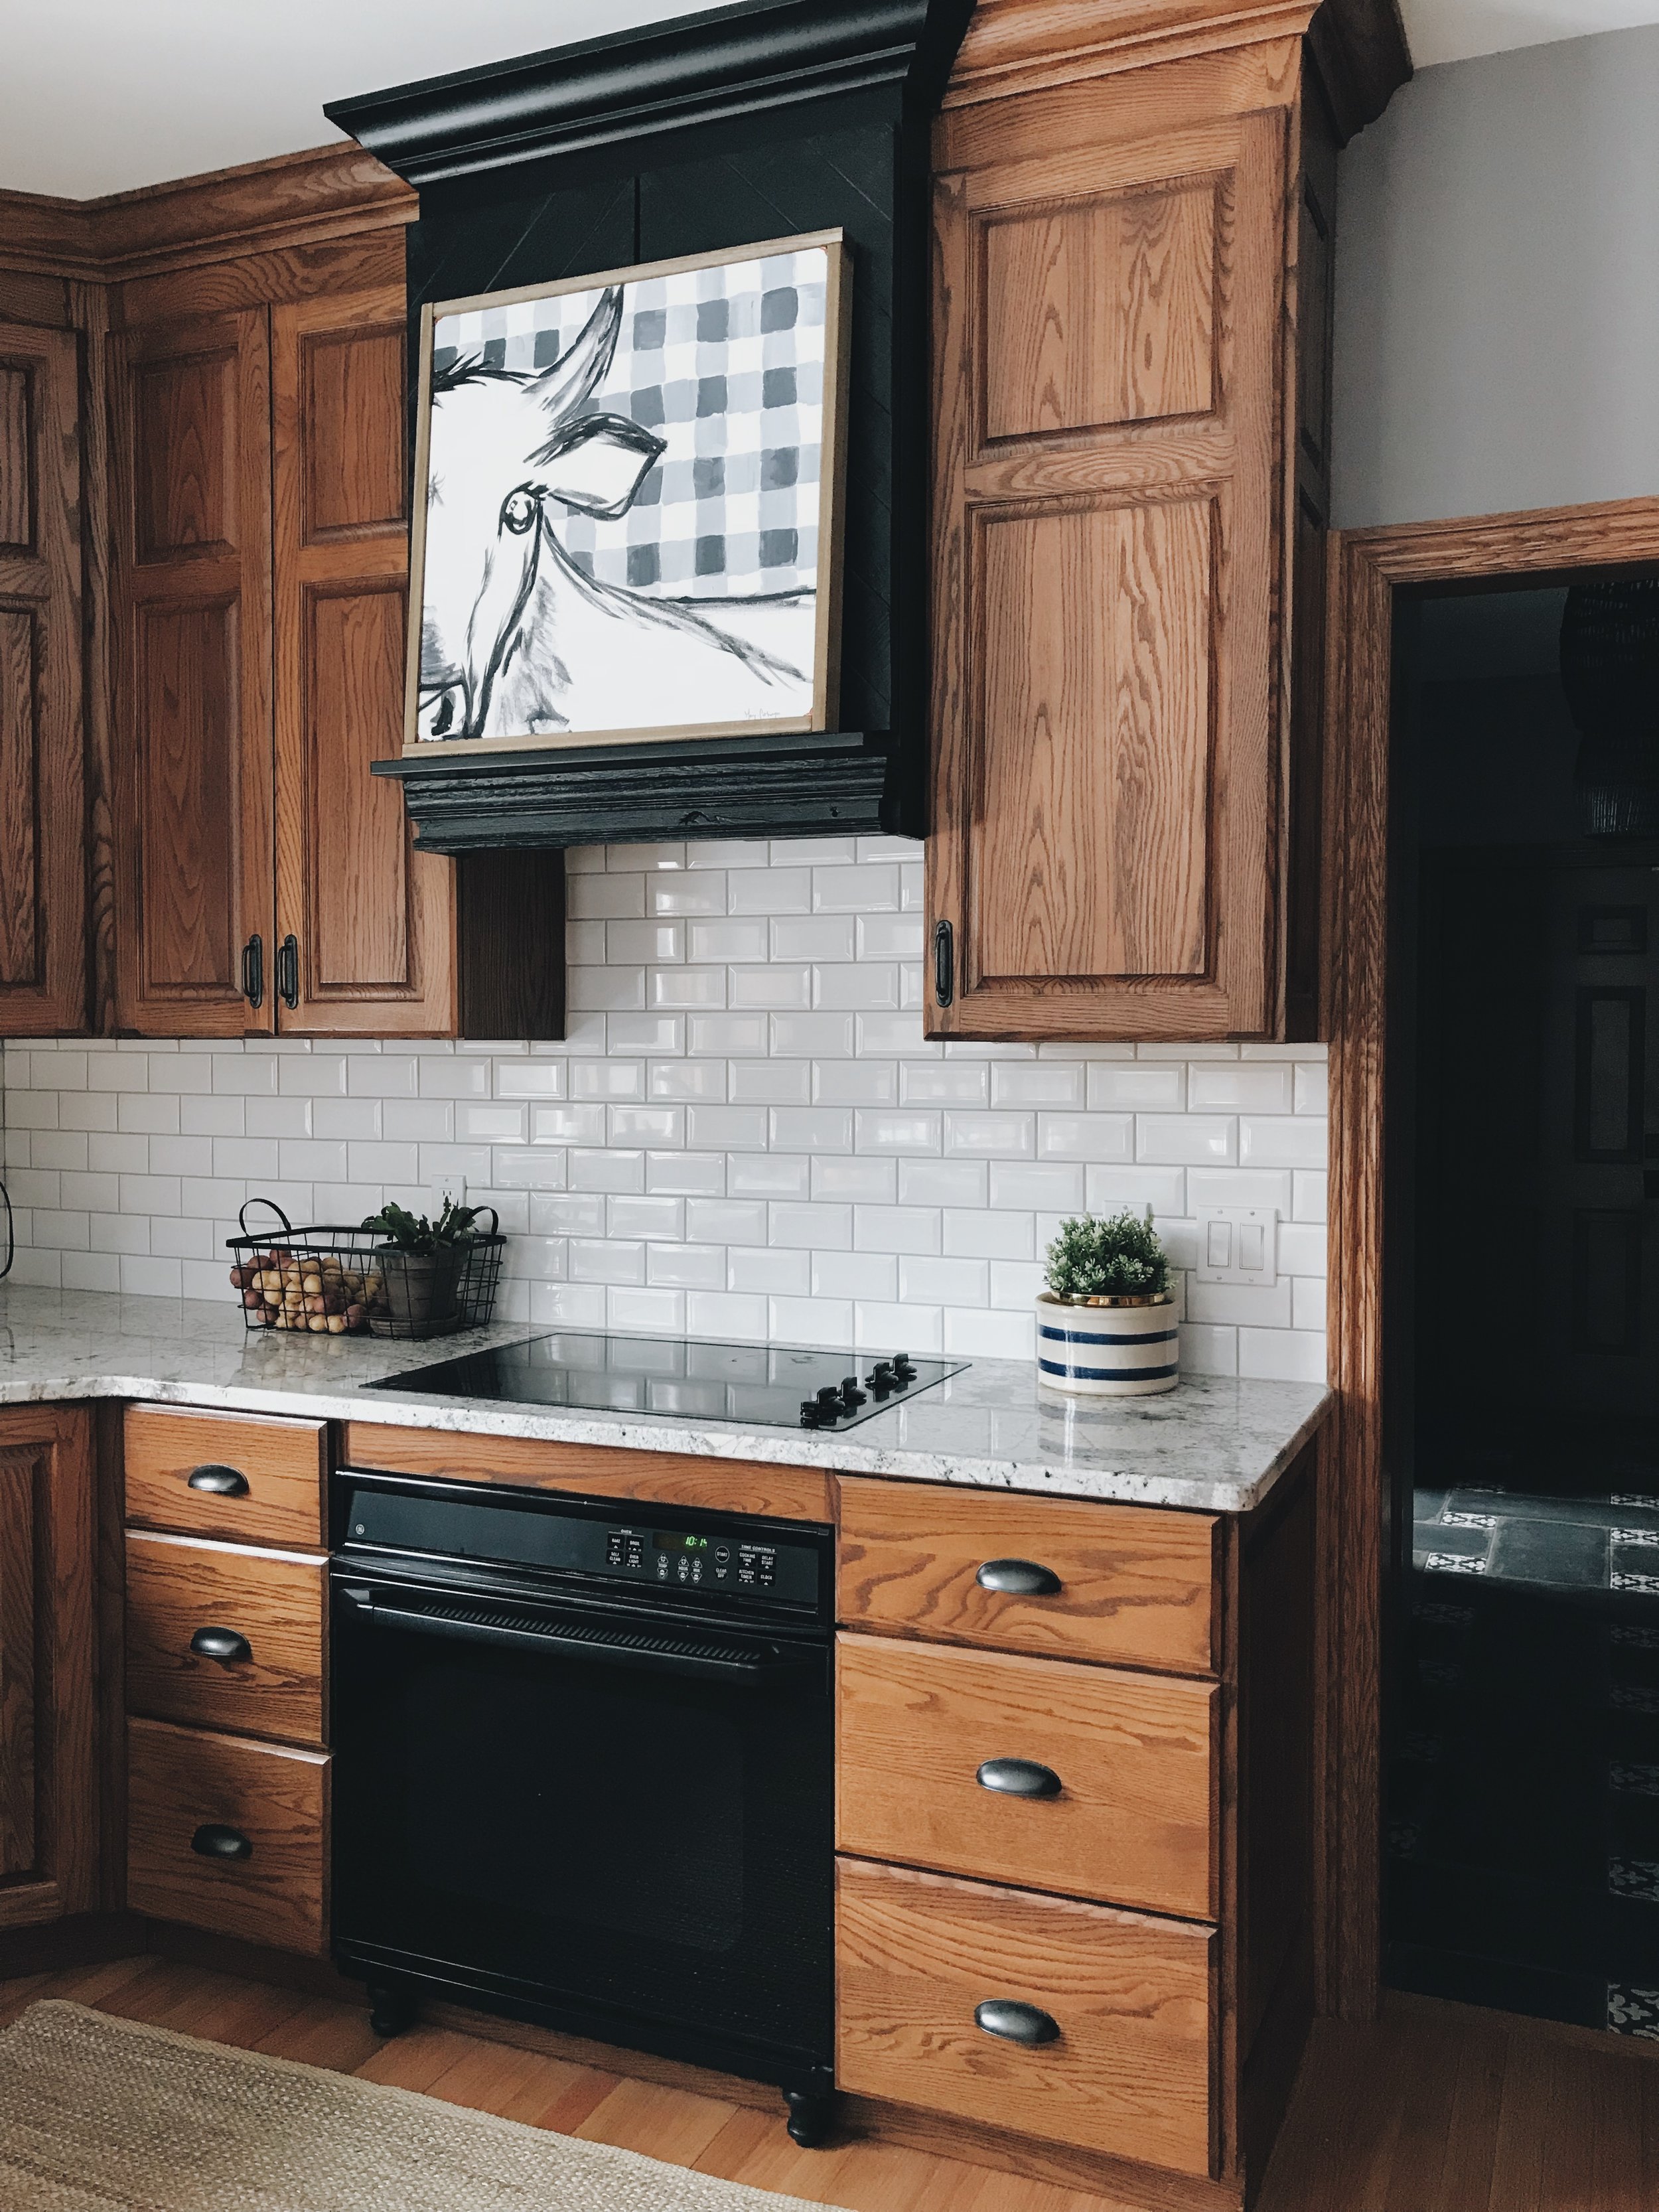
First thing, and least expensive, we updated the hardware. I found some pulls that I just loved at Target. I was tad weary about buying inexpensive pulls, afraid they would wear quickly, exposing some strange color underneath the finish. But they didn’t! We have had them now for almost 4 years and they are still perfect like the day we bought them. They are no longer available, but I did find some other options HERE, HERE and HERE. Since, we have a lot of cabinets and I didn’t want the exact same knob repeated everywhere, I searched for another style of pull for our drawers with the same finish. I found them at Lowes HERE. I also spotted THESE and love them as well!
I could not decide if I wanted to do a traditional white backsplash or an edgier black one. Since I had the time and paint on hand, I painted the backsplash to see how I liked it.
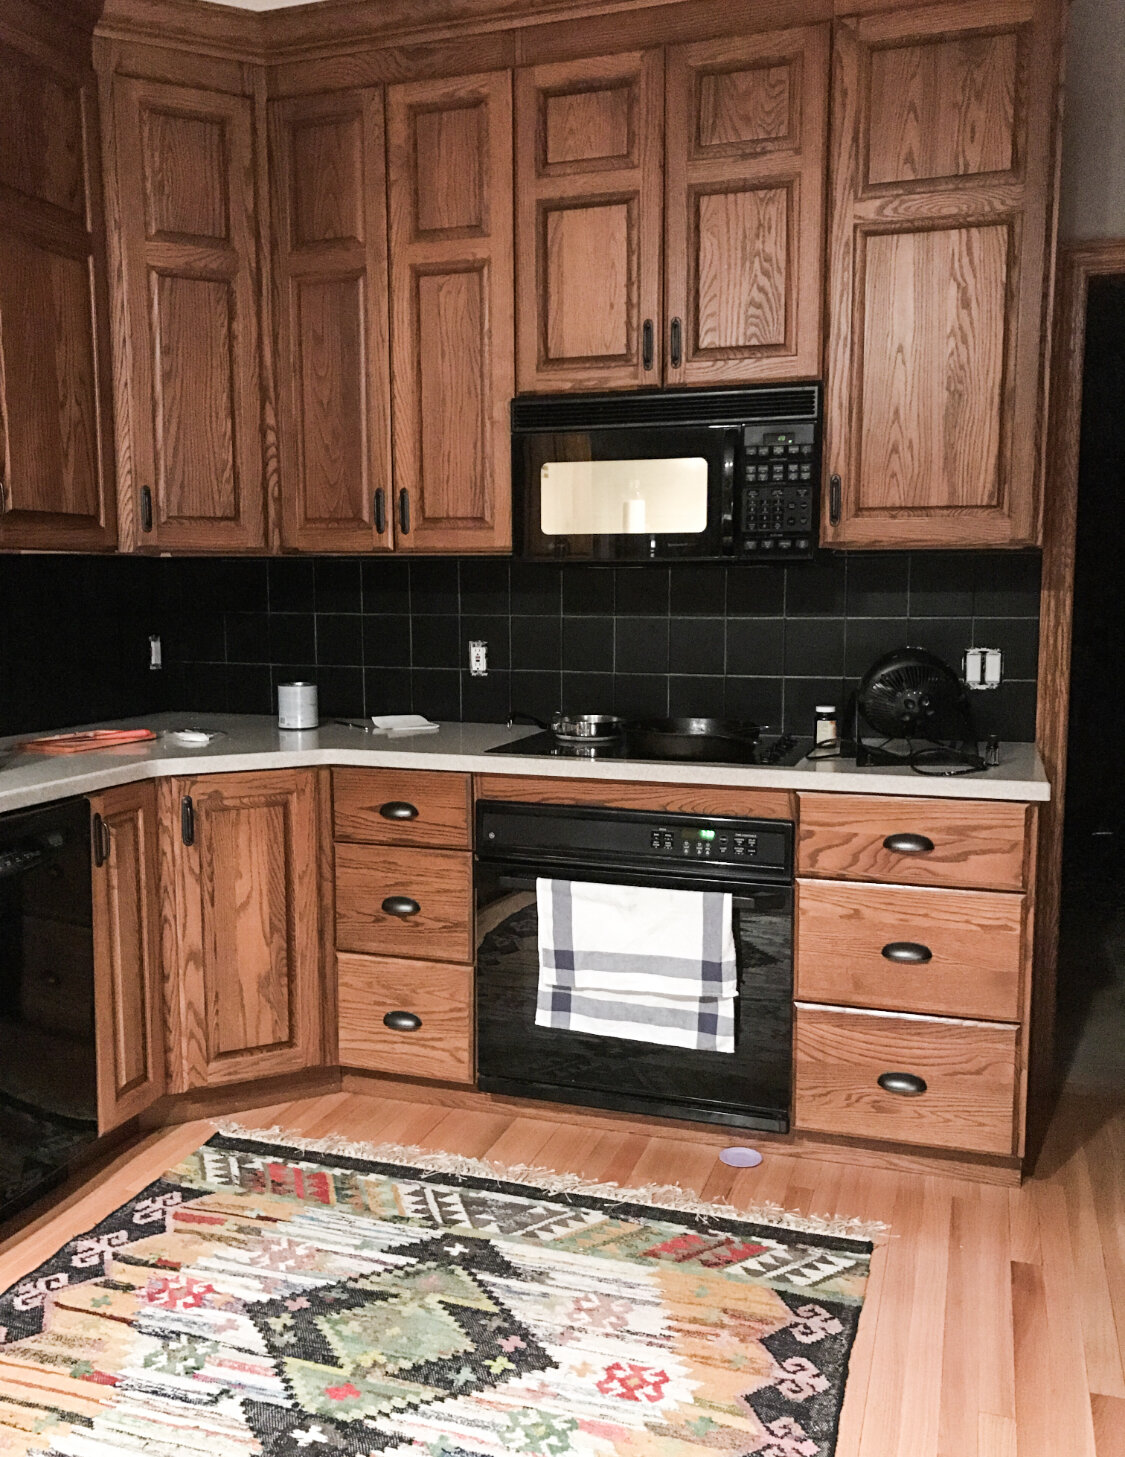
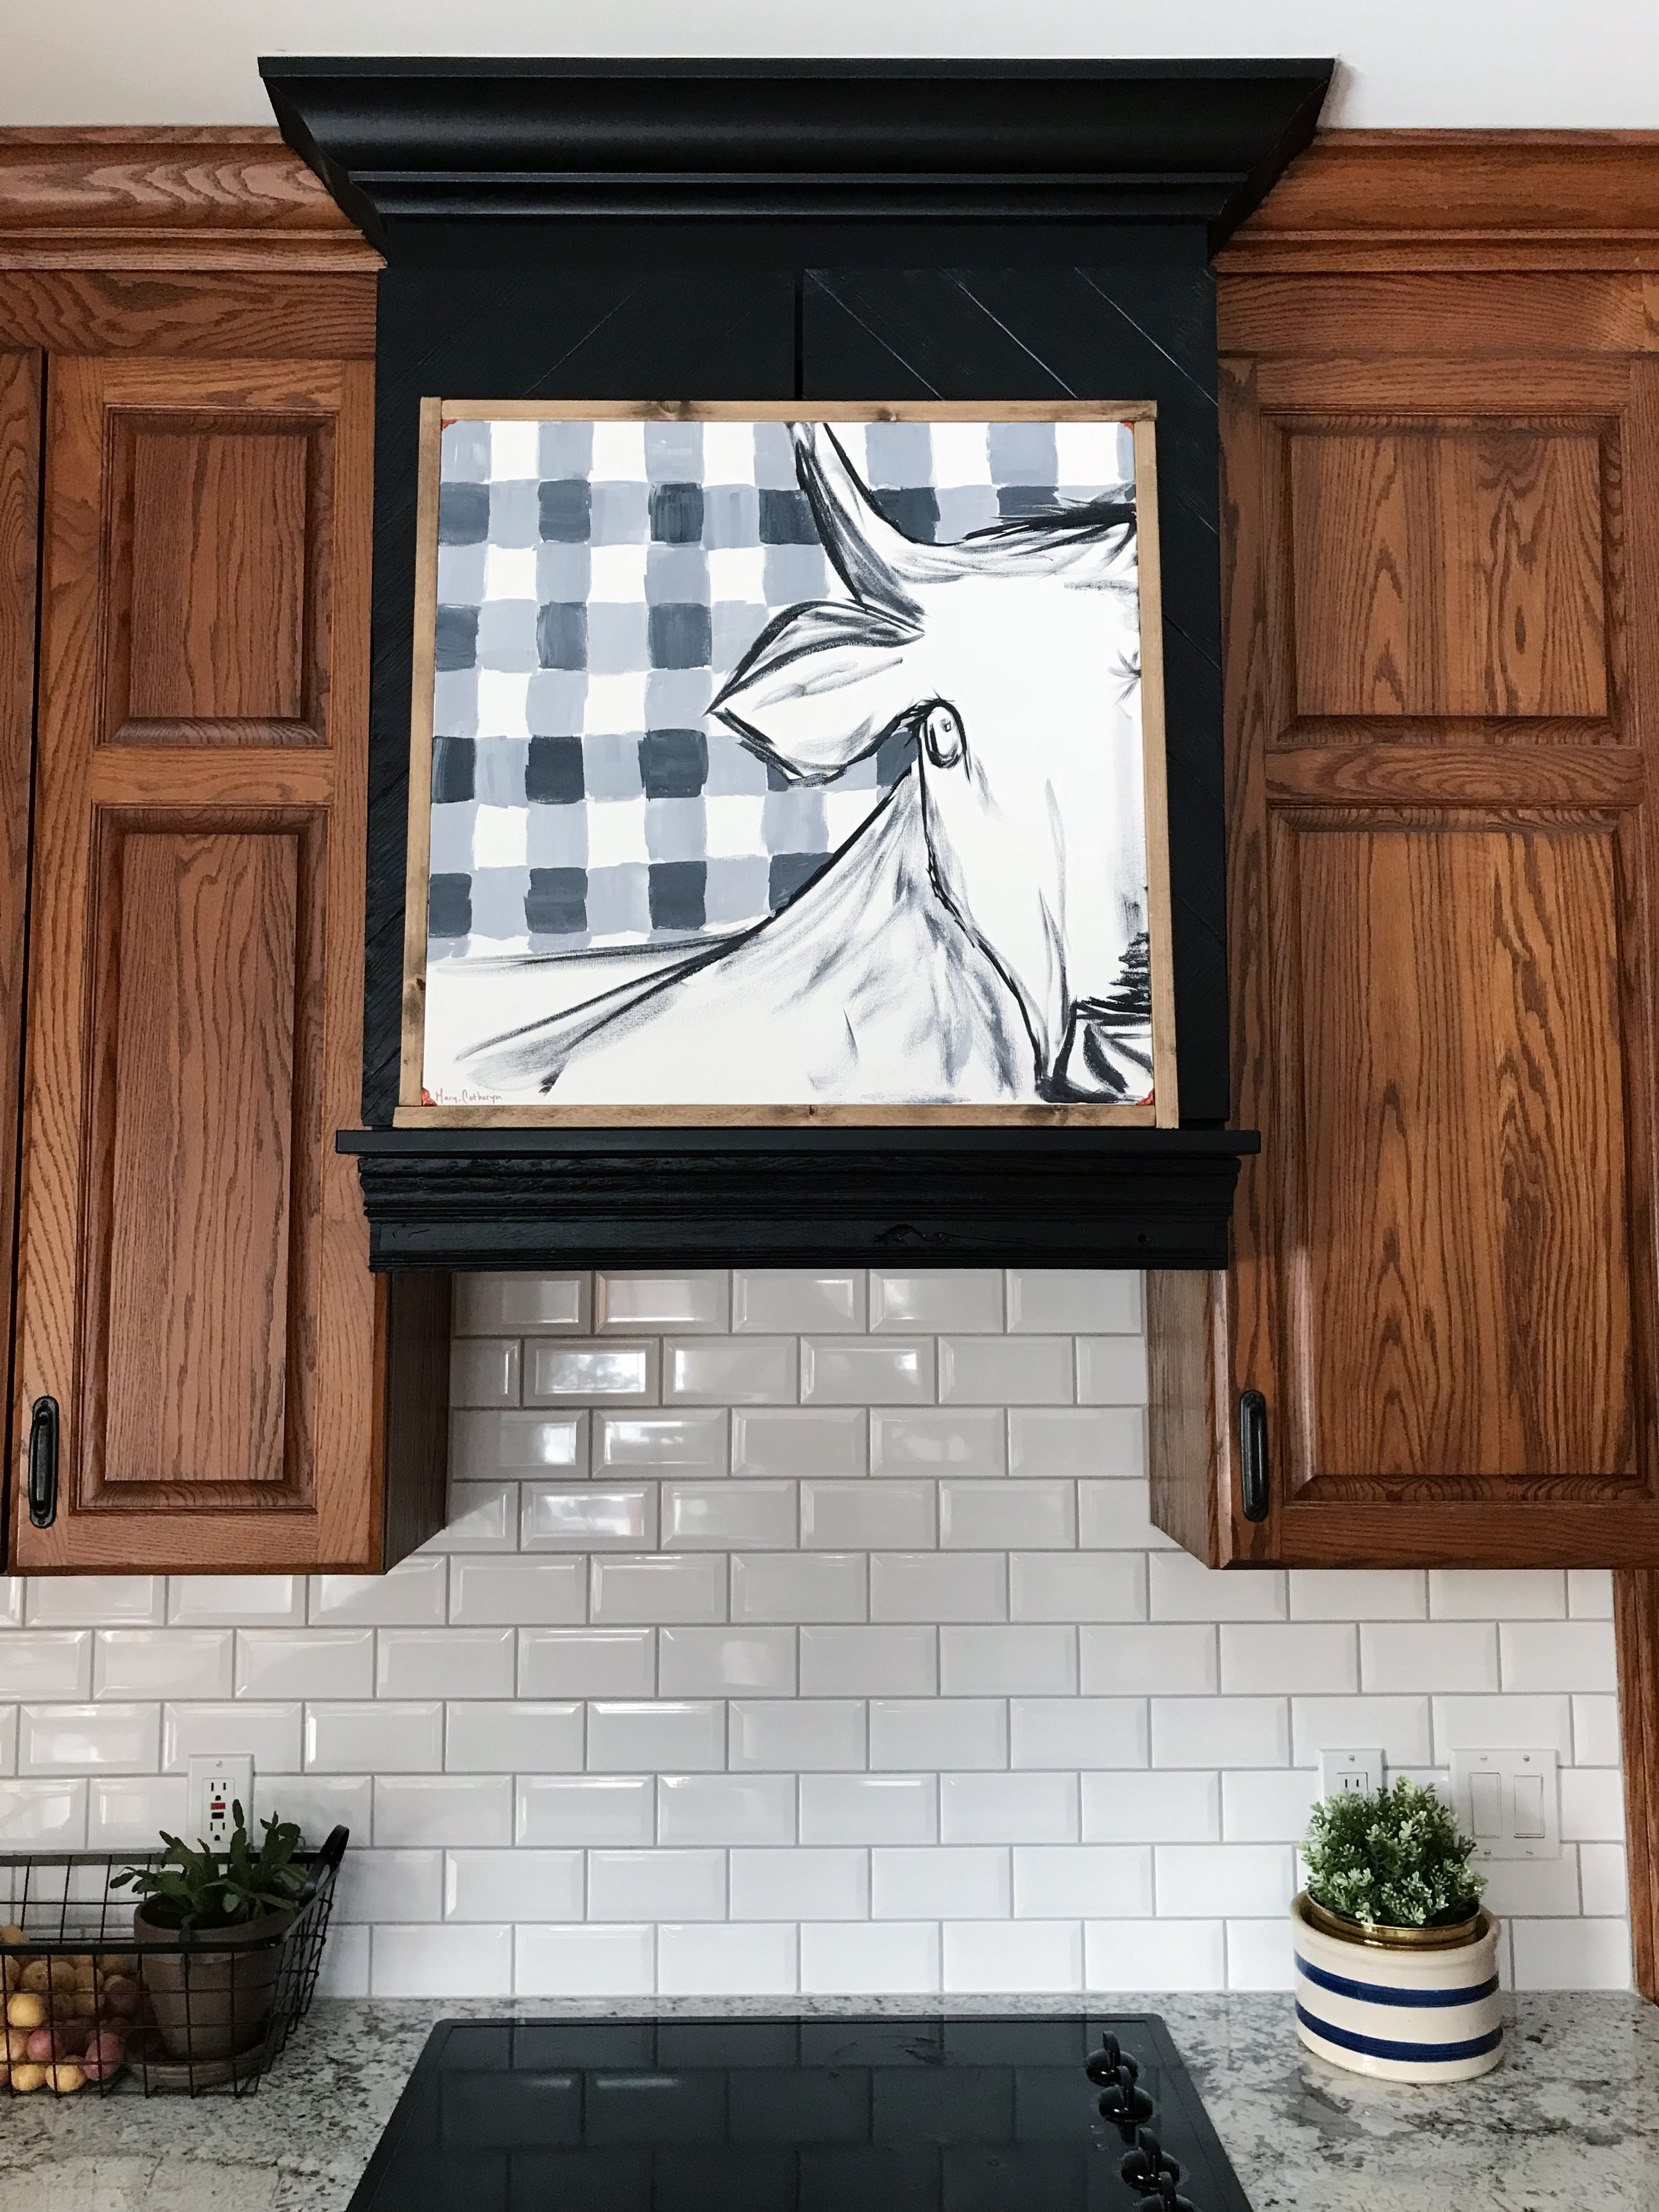
I took this photo at midnight, once I had finished painting them black, hence the spotlight I grabbed from the barn. It was ok. I wasn’t in love. I designed a black “hood” that was going to go above the stove, so I figured it might be too much black once it was installed.
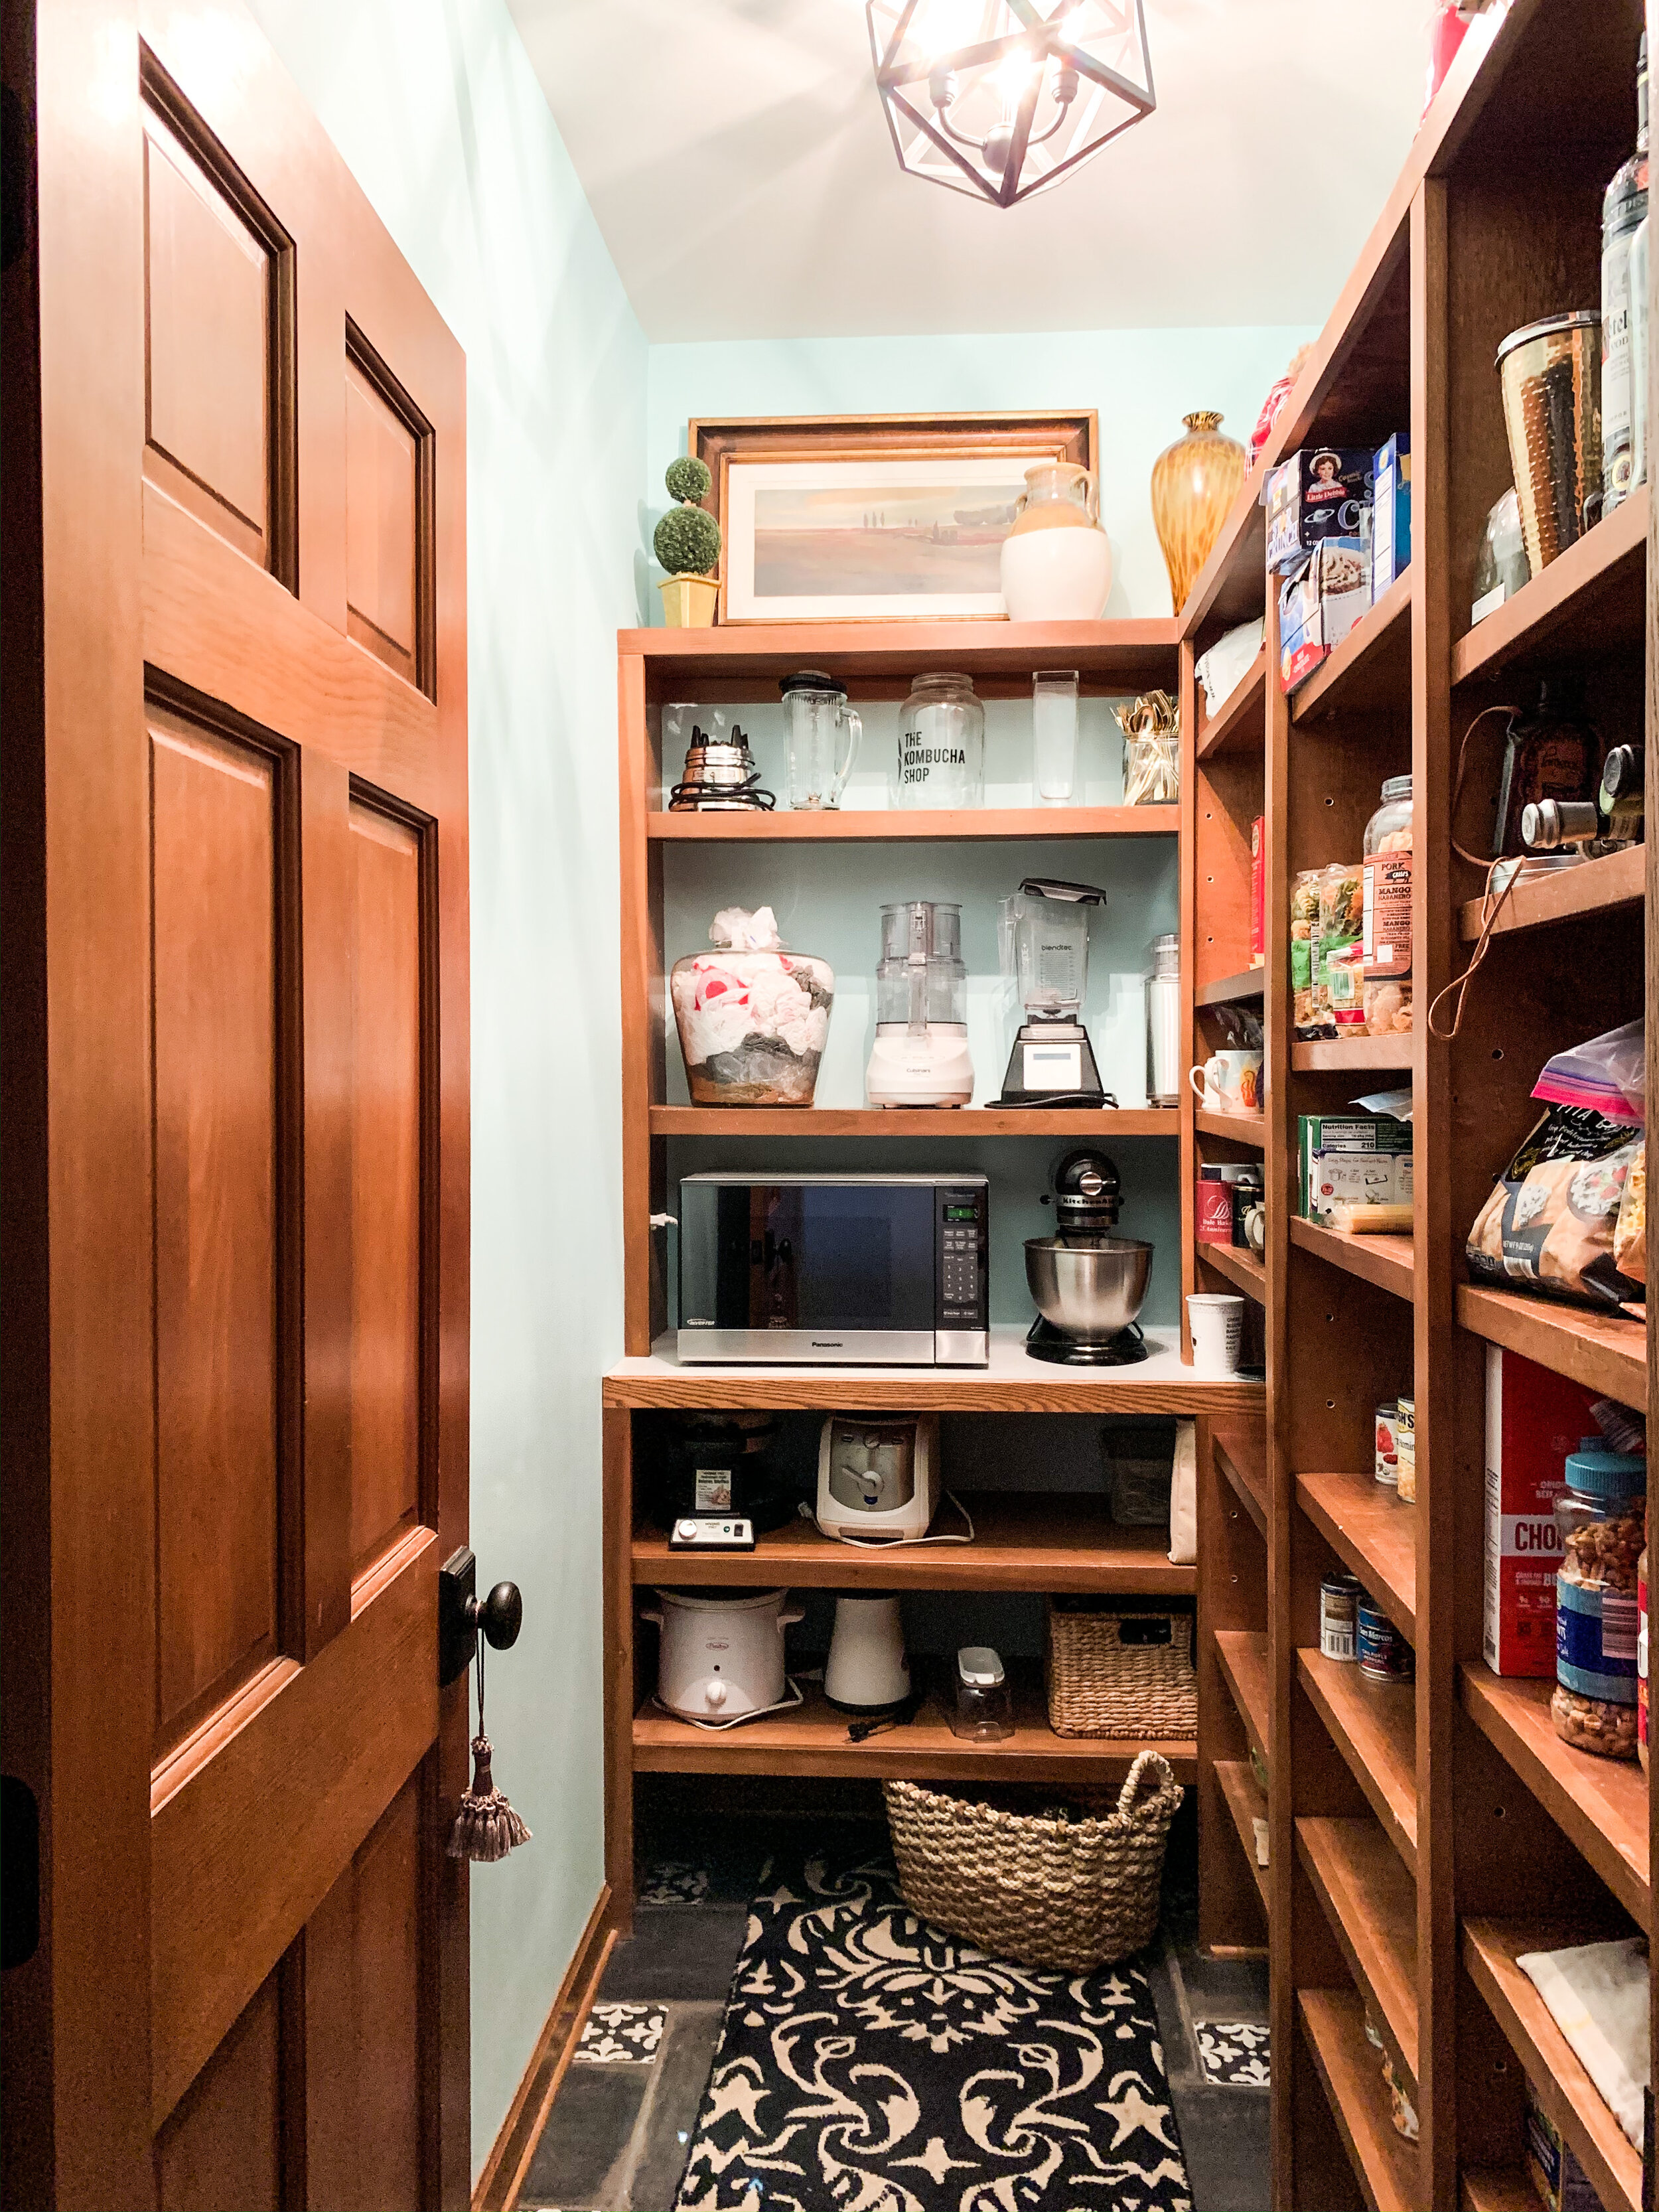
Also, the microwave was not in my new-hood design plans. So, my husband and I removed it and got a smaller one to fit in our pantry. I love the microwave in our pantry soooooo much more and plan on always having the microwave in a pantry from now on in any house we live in.
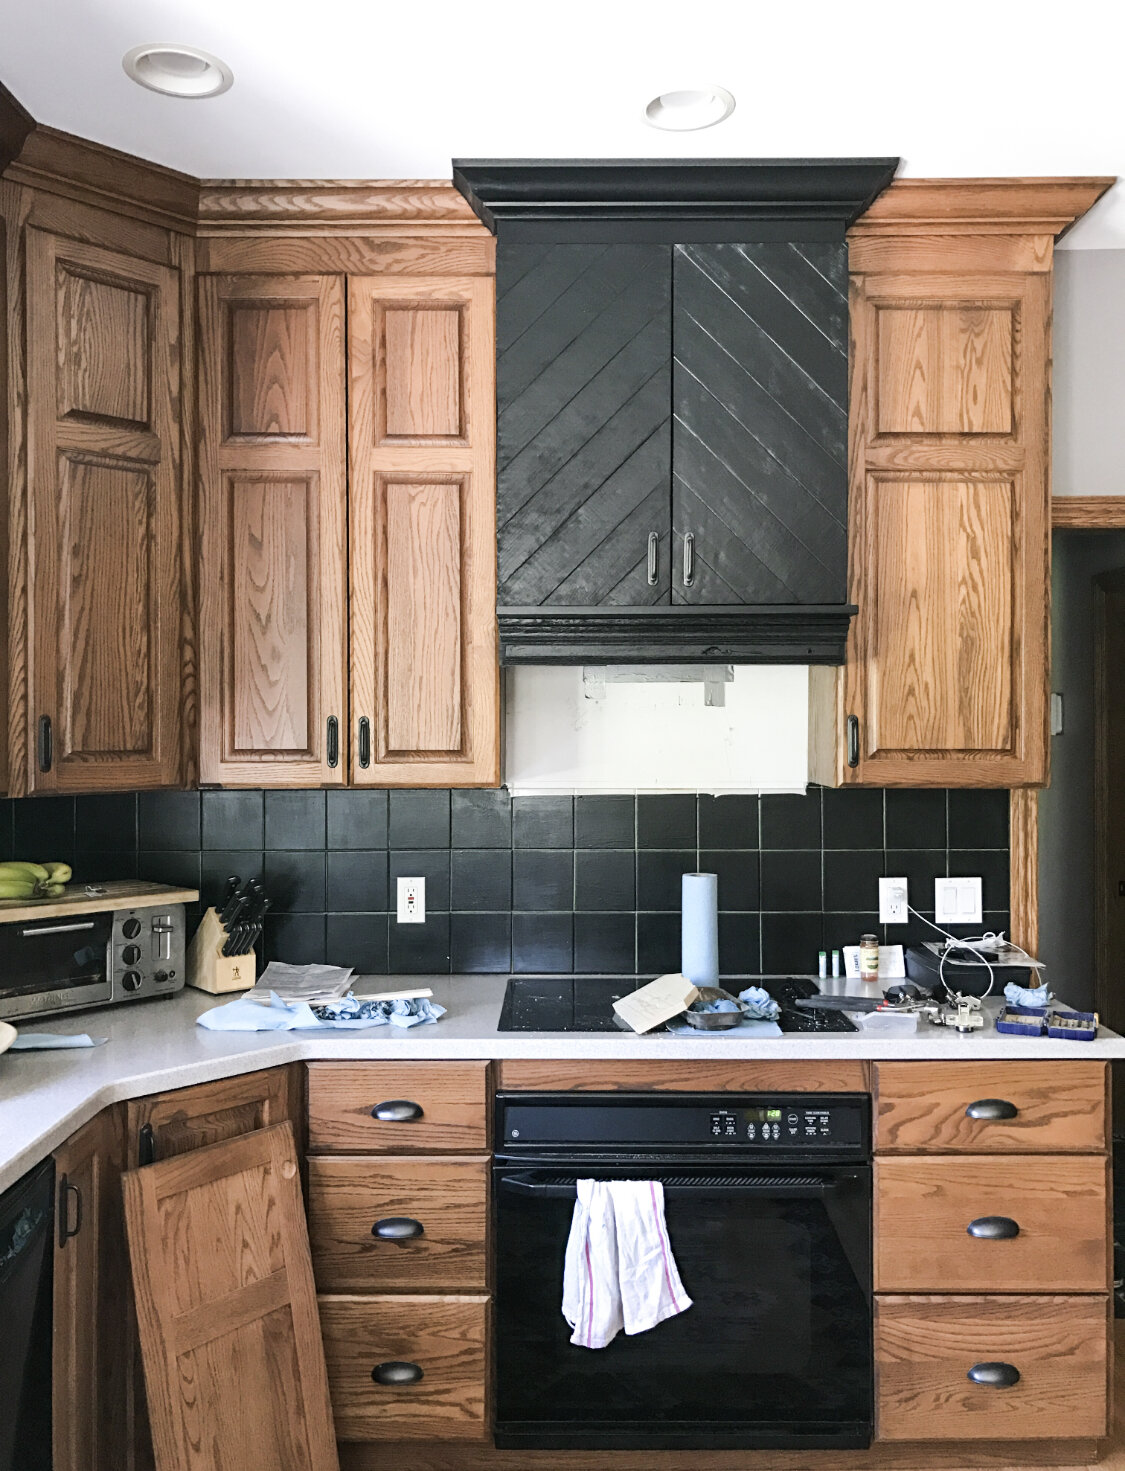
I found a local wood worker who was able to come over, measure once ( I still have no idea how these guys can do that) and make my hood design. Here are a few things that I wanted when I came up with the design:
I wanted to break up the wall of cabinets, so I needed a variance in depths. This new cabinet needed to stick out from the rest. I also designed the doors to be different from the rest of my cabinet doors.
I think that black + oak is such a rich combo of colors, so I wanted it to be black. This would also match our appliances. I did not want to buy new appliances just because.
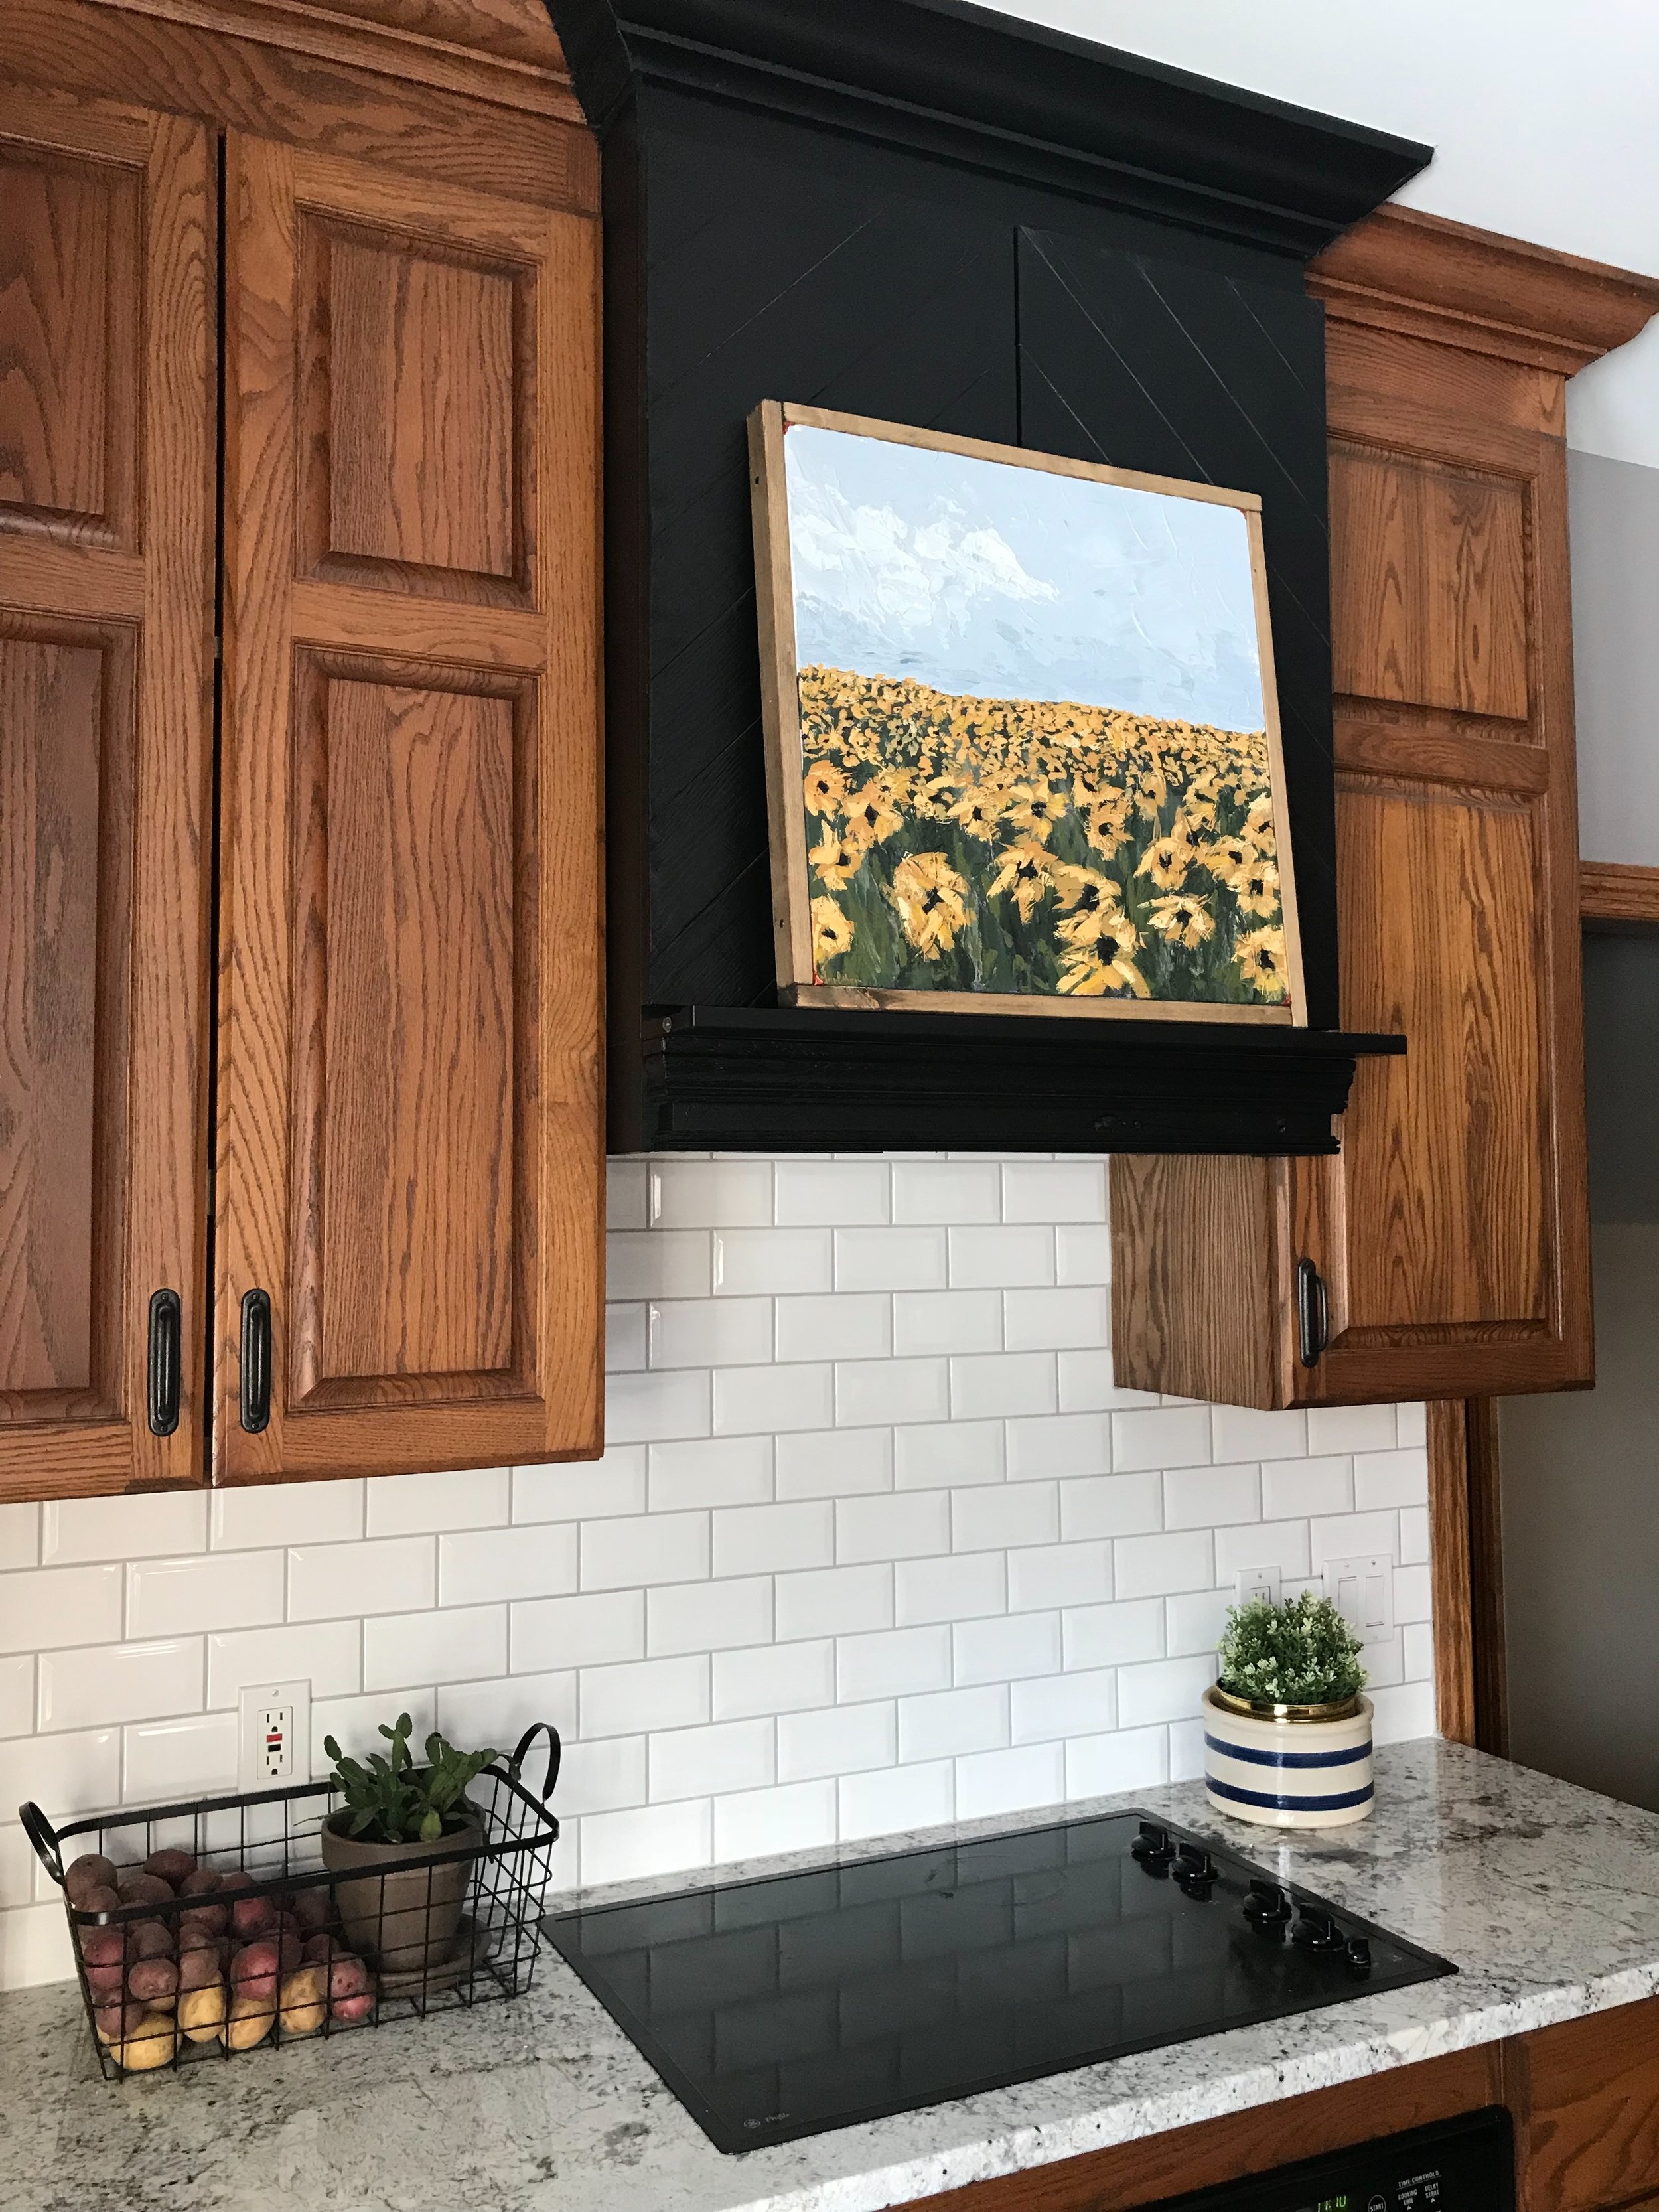
A ledge was a necessity. I love artwork in a kitchen and wanted to be able to display it easily.
I still wanted to use that cabinet for storage, so it needed to fit over the existing cabinet.
I wanted it to have the same crown moulding as the rest of the cabinets.
The new hood needed to extend a tad lower than the existing cabinet because I wanted to install a light and not have it be visible.
Once it was finished, he came over, removed the old cabinet doors and installed the whole thing in less than 30 minutes. It fit like a glove!!

I did not install a vent because I rarely ever used the vent (pro chef over here😉) and I did not want to lose the storage space. In the 4 years that we have lived here, there have been 2 times where a vent could have come in handy. Instead we just opened windows.
(The white space below the hood is where the microwave was)
I took a few photos so you can see how it was installed over the existing cabinet. This photo shows how the hood sticks out from the other cabinets by about 5 inches. If you want to do something similar, but your cabinets do not go to the ceiling, try designing your hood to extend a few inches above your normal cabinet height. This is a perfect way to give your kitchen a custom feel and some height!


Not sure if this next picture is understandable or not, but I had my dad install an led light under the new hood. Since the microwave was there before, the cord went through the existing hole where the microwave cord was and plugged into the same spot. This is why I wanted the hood to extend a tad lower than the existing cabinet. I wanted a perfect little cove for a light. If we would have ended the new hood where the existing cabinet ended, the light would have been visible from the front.


Here you can see where the new front is simply screwed into the old cabinet.

Afterwards, we installed tile (a simple white beveled subway tile) and added new countertops (Fantastic White granite). I debated between a white tile and an off-white tile. I thought the warmth of an off-white would flow better. But once I held it up, the wood cabinets reflected onto it making it even creamier and yellower. A look I did not want. When I held up the white, the wood reflected onto, creating that warm white that I originally wanted. Keep reflections in mind when testing your things!
I always get asked if we restained the wood cabinets. NO. We did not. That would have been such a pain in the butt. Let me tell you… painting cabinets is a pain in the butt. Especially this many. Also, if you have painted cabinets before, you know that they simply do not hold up. They wear quickly, chip easily and need to be re-done every few years. I do not have time for that!
Change the colors AROUND the cabinets and that will change the look of them. Since these cabinets were an orange-y yellow, I painted the surrounding walls with a gray that has purple undertones (bleached shadow by valspar). We are going deep here. Everything reflects (except for black). If you look at a color wheel (google it)… the color on the opposite side is the “neutralizer”. So by painting the walls with a gray that had a purple undertone, it reflects onto the cabinets neutralizing the orange on them. Try it. You will be amazed. Now… do not go and buy purple paint 😂. Just get a color you would normally buy, but make sure it has a purple undertone or hint to it if you are trying to tone down an orange-y wood. Another thing I did was get a rug. Before the kitchen had yellow lights reflecting onto a yellow floor which reflected onto yellow cabinets. Way too much yellow and way too much reflecting of the same color. This rug (from World Market) has similar grays to my walls as well as some other muted tones that are NOT reflecting yellow onto already yellow/orange cabinets. Are you picking up what I am laying down?
You can find our hardwood floors HERE. They are phenomenal quality and not insanely expensive.
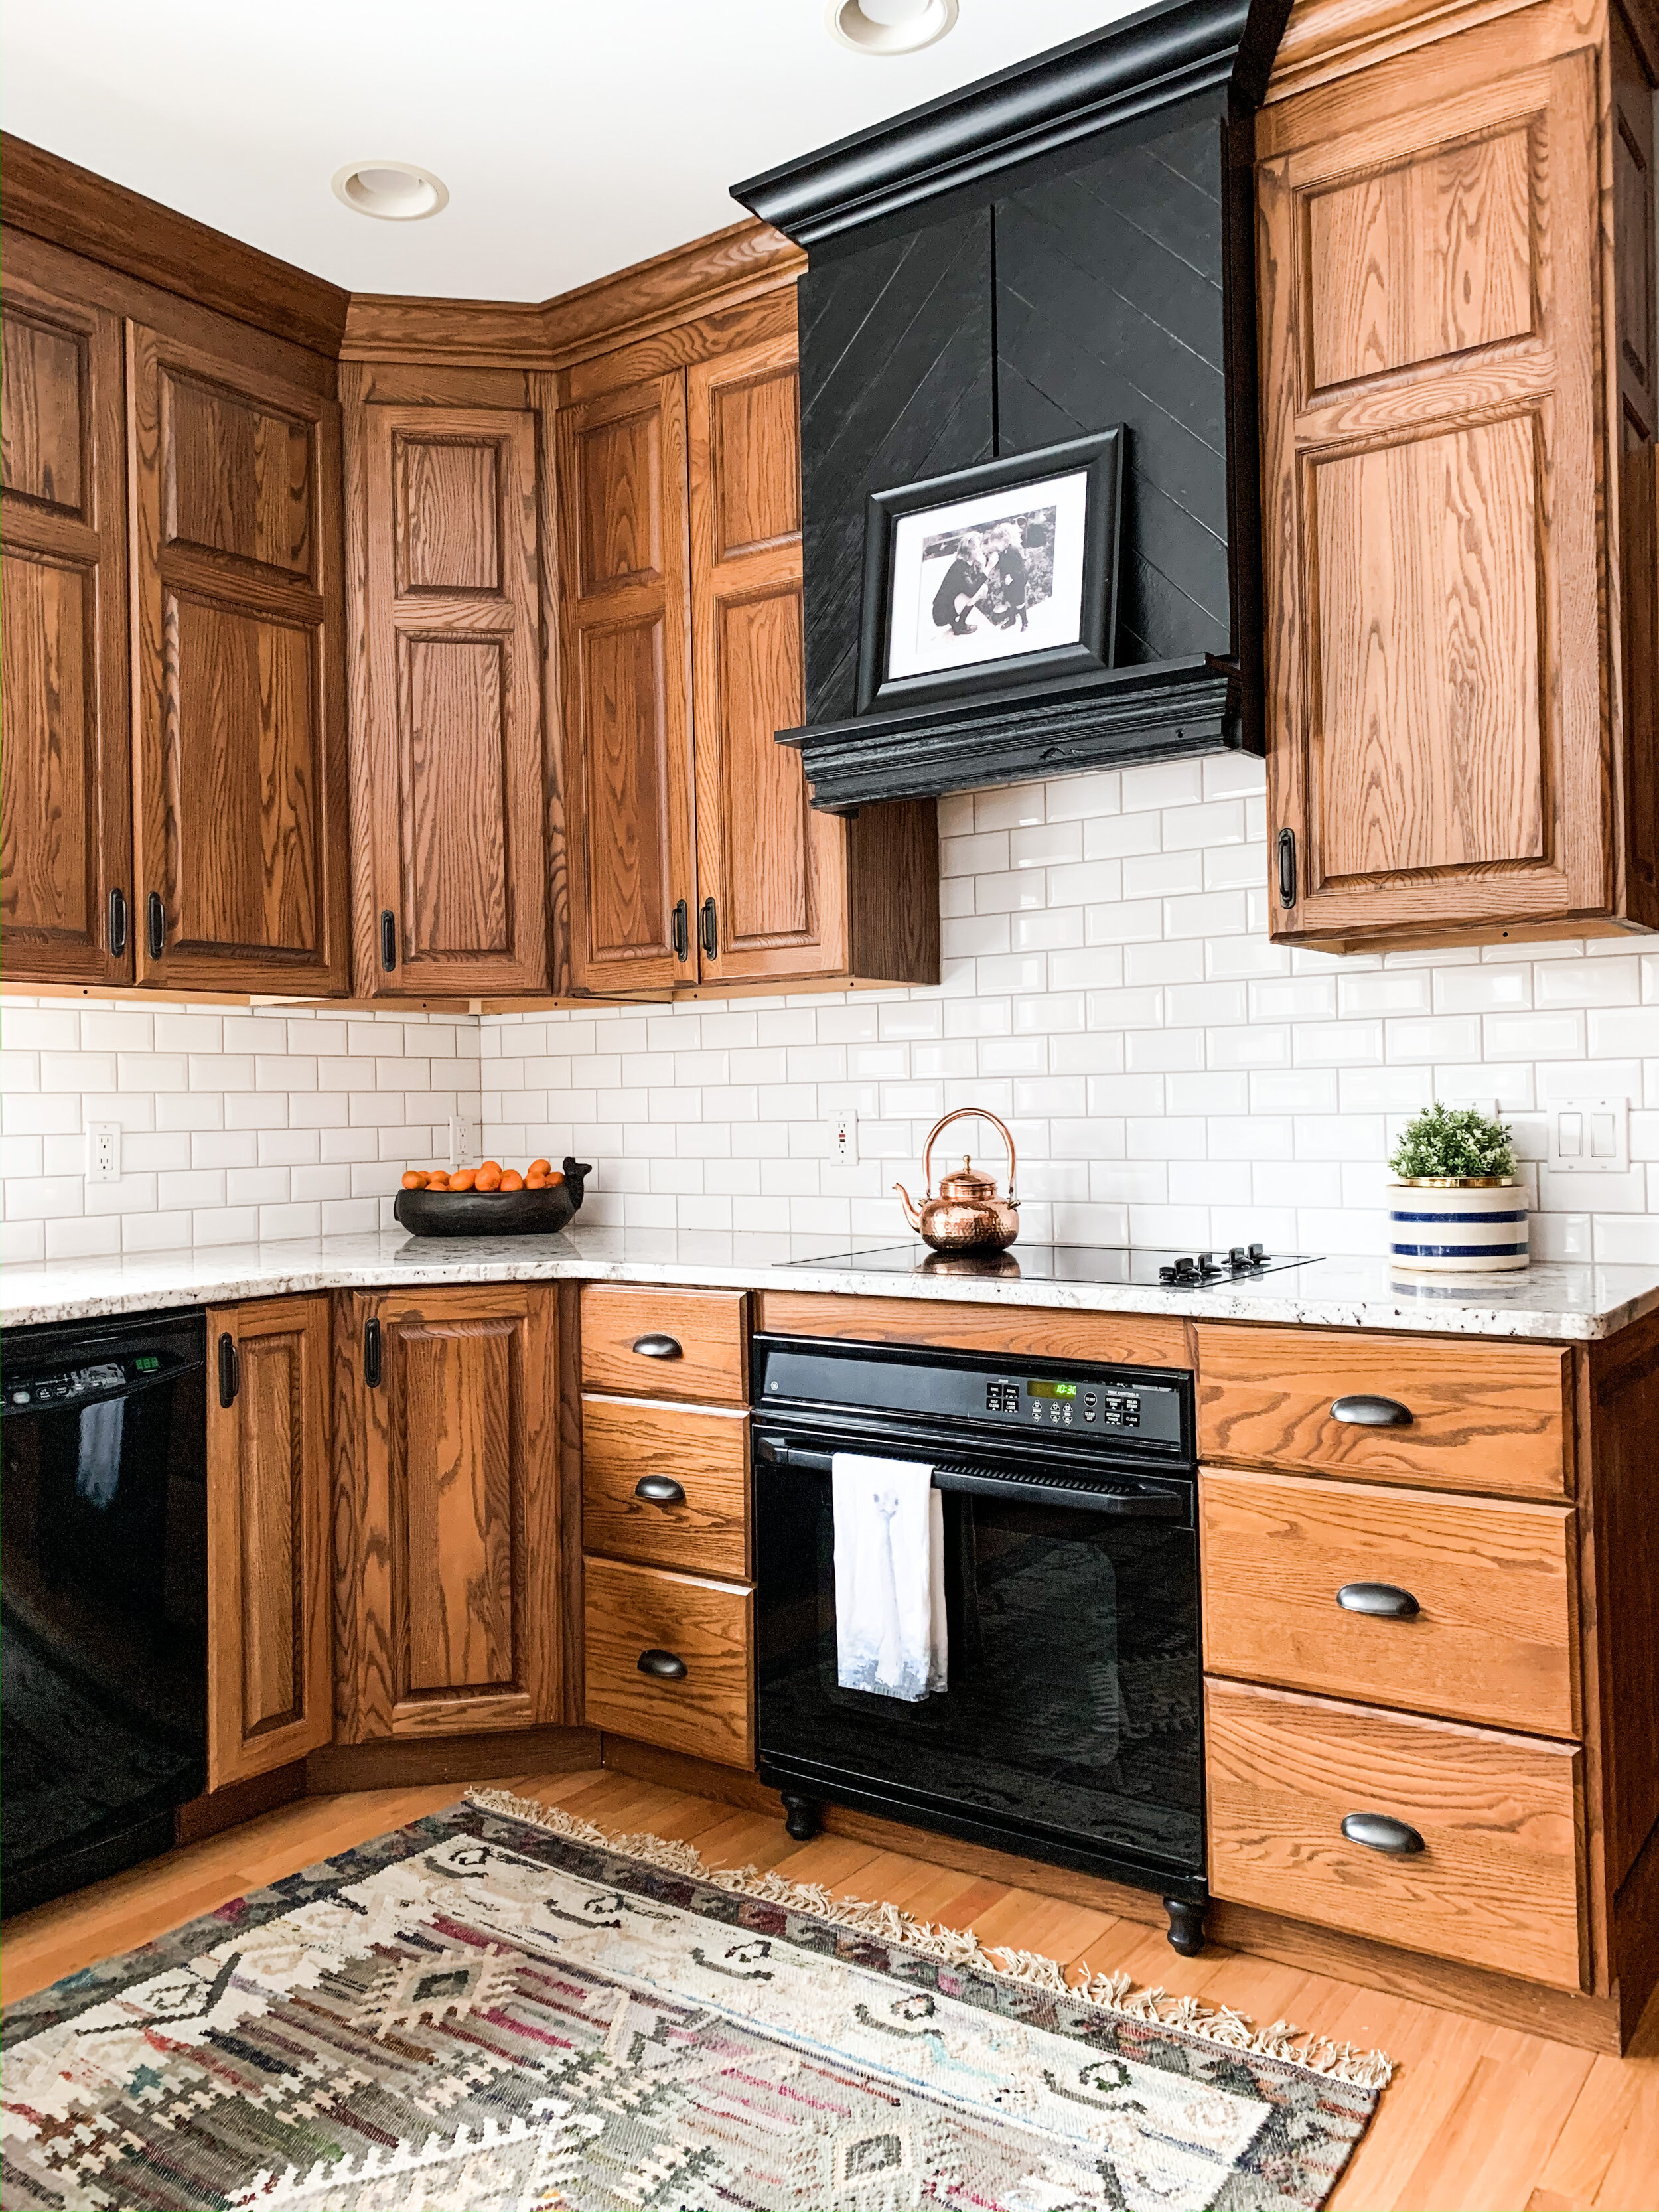
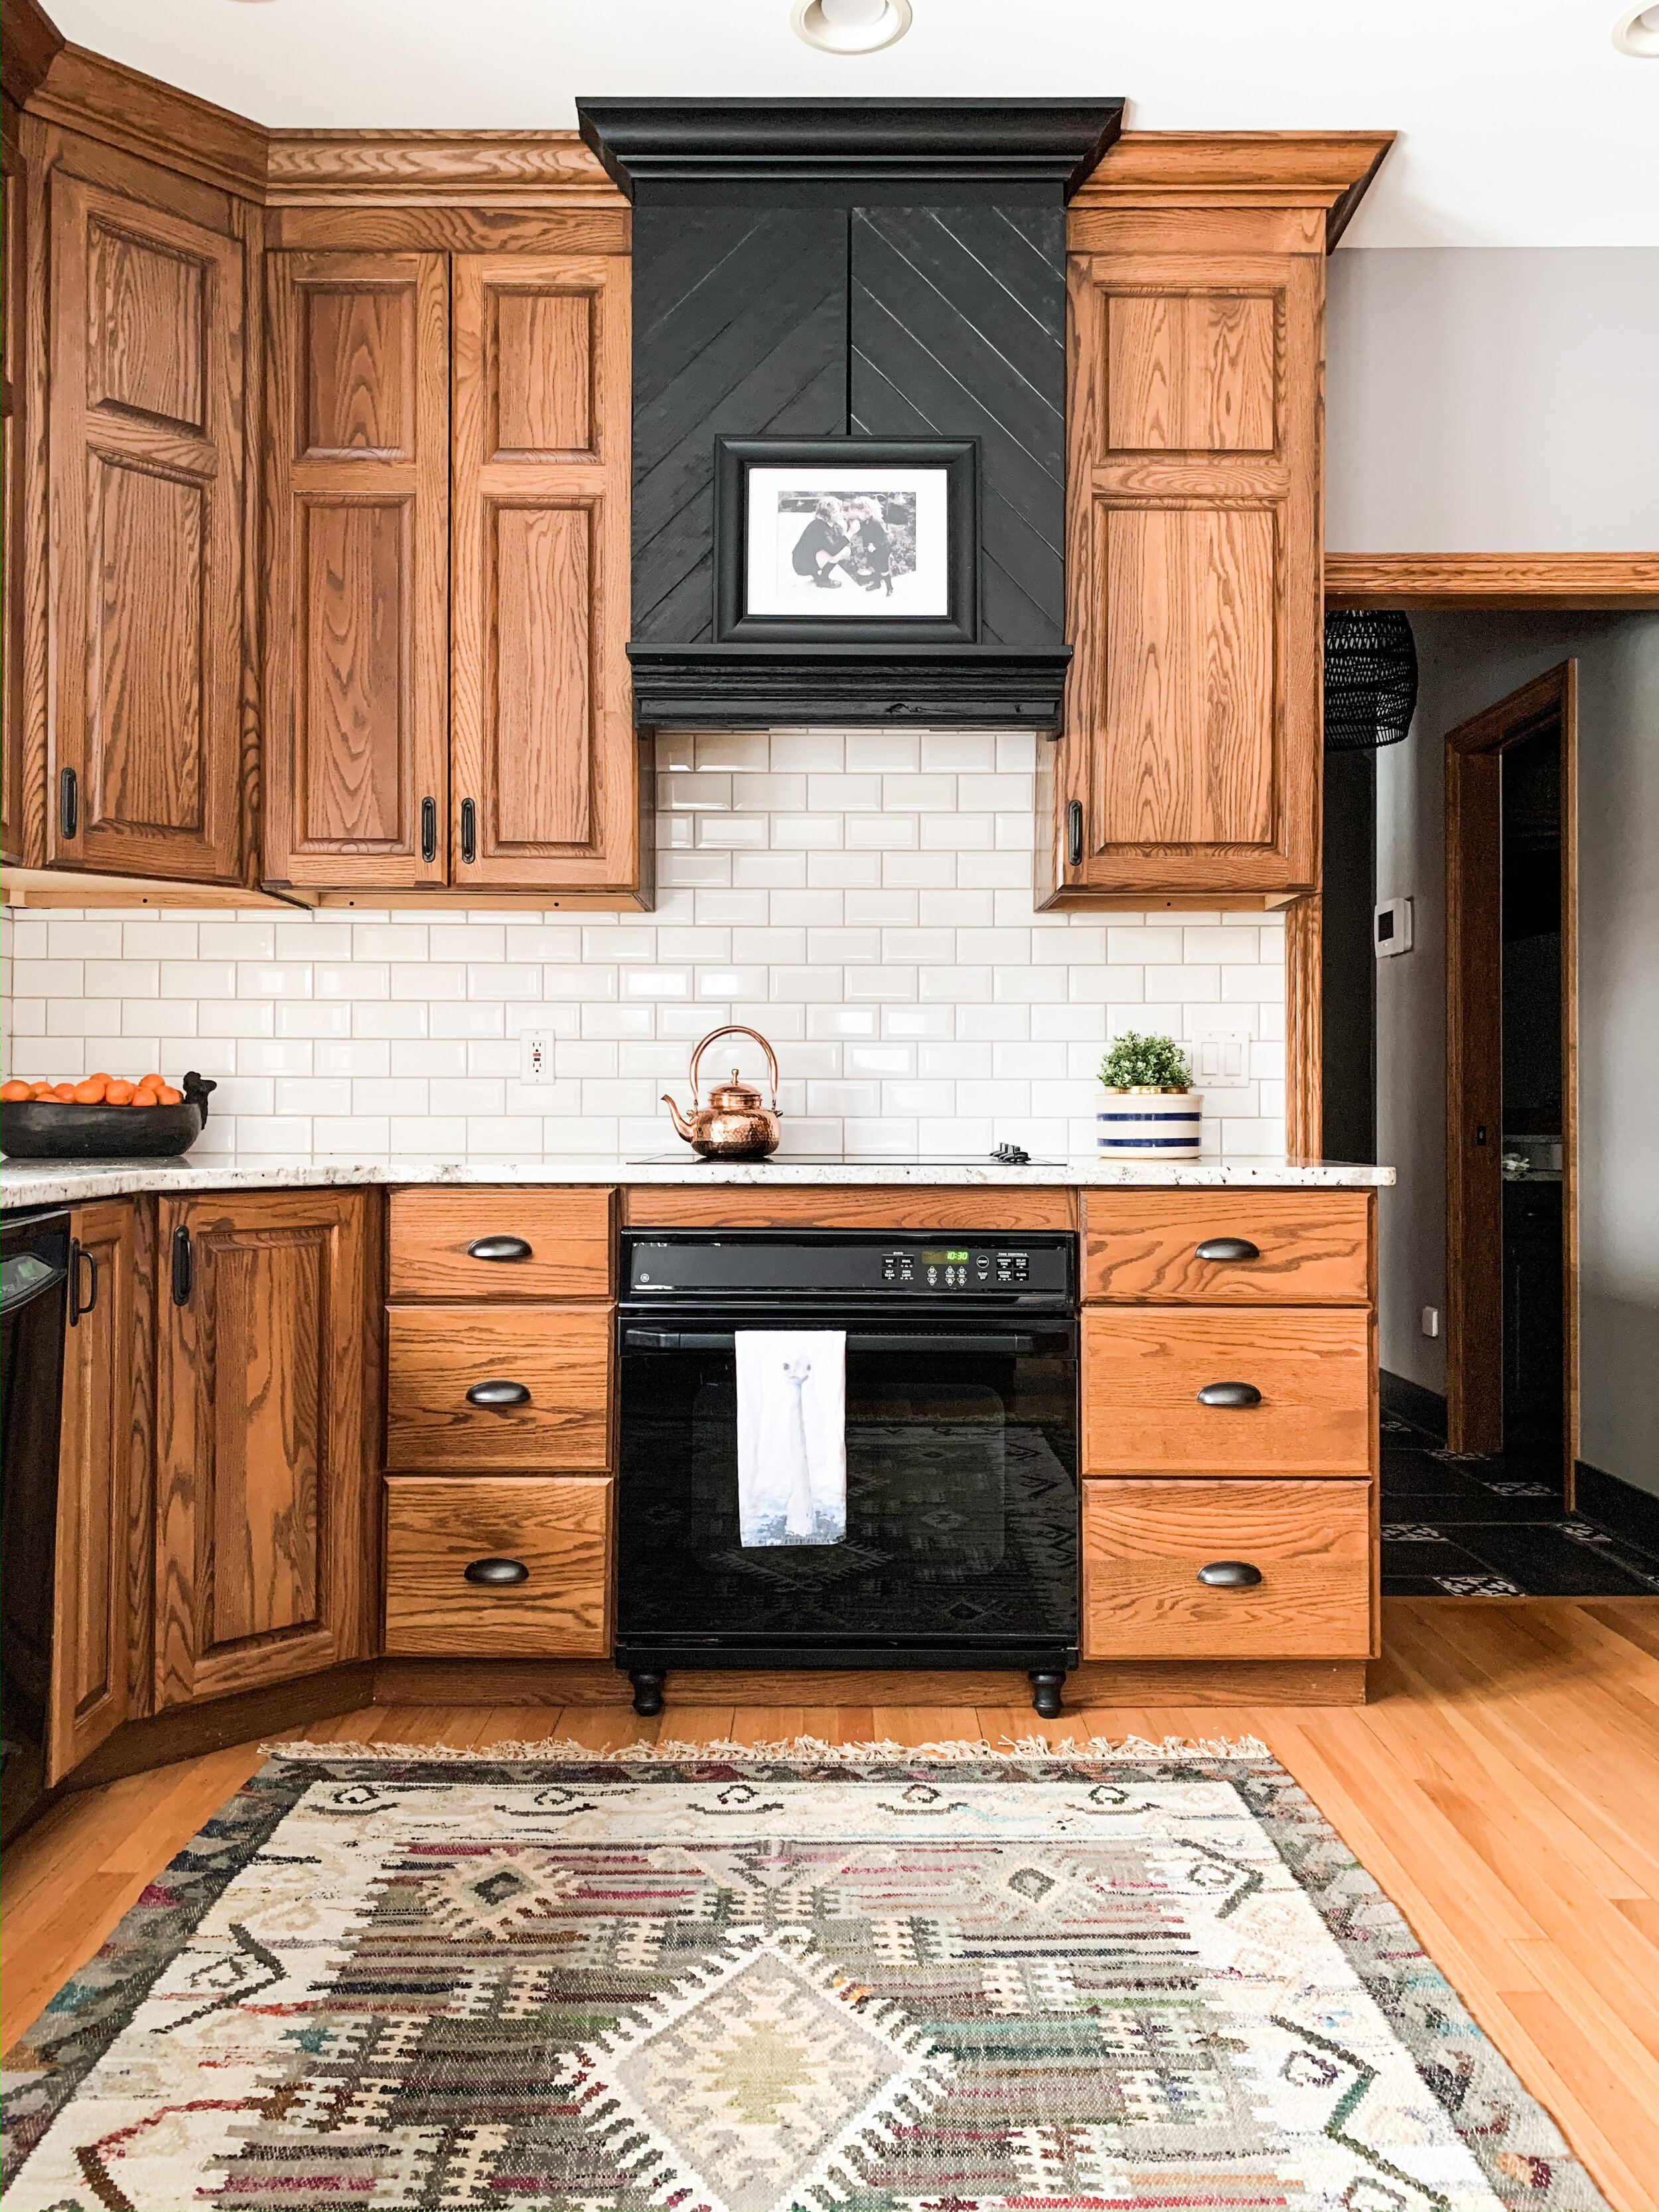
If you scroll back up to the very first photo, you will see that the oven used to float🙃. I grounded it by finding some cute little feet from Lowes. I painted them black and wedged them under the stove, giving it a custom feeling also breaking up a straight line of cabinets down below.
Replacing all of our kitchen cabinets with the same quality would have cost anywhere from $18,000 - $30,000. Not today!
I hope this inspired you in one way or another! Leave a comment or tag me in a photo on instagram @CopperCorners. I’d love to hear from you and about your projects! :)
To see other blog posts, click HERE
Make sure you swing by the giftshop before you leave HERE! My main job is creating custom art and the fabulous wallpapers that I design. They work beautifully with oak ;)
Thank you!
xo
Mary-Catheryn
P.s. You can also check out how I updated our oak fireplace HERE.